Guestbook

X-Steel - Unavailable
Tampilkan postingan dengan label Tutorial. Tampilkan semua postingan

Rabu, 09 Mei 2012

Fairy Night Eye

Fairy Night Photo Effect If you want the best in CCNA training try a video course.

This task we'll learn how to correct the photos' colors, change the eyes color, work with the layers, applying ready brushes and designs, create your own design and to picture the stars.

Let's start. Open image:

Fairy Night photo editing in adobe photoshop cs

Apply Image ? Adjustments ? Curves (ctrl+m) to correct the colors.

Fairy Night photo editing in adobe photoshop cs

That is what we've got:

Fairy Night photo editing in adobe photoshop cs


To change the eye's color we have to picture on a new layer several circles, using Ellipse Tool. (Use the fast button on the Layers window to create a new layer).

Fairy Night photo editing in adobe photoshop cs

Apply to this layer Filter ? Blur ? Gaussian Blur.

Fairy Night photo editing in adobe photoshop cs

Change the layer's type on Overlay.

Fairy Night photo editing in adobe photoshop cs

Energy

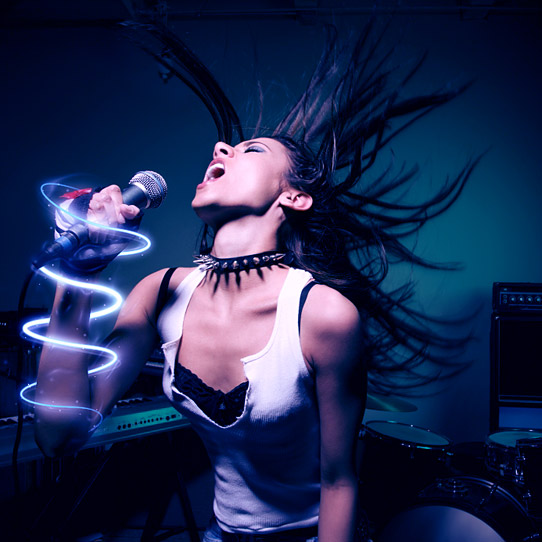
Here's a great effect that will bring some energy to your subject. We'll be wrapping this singer's arm with a glowing beam of light, adding sparkles, and adjusting the colors to make it all seem magical.
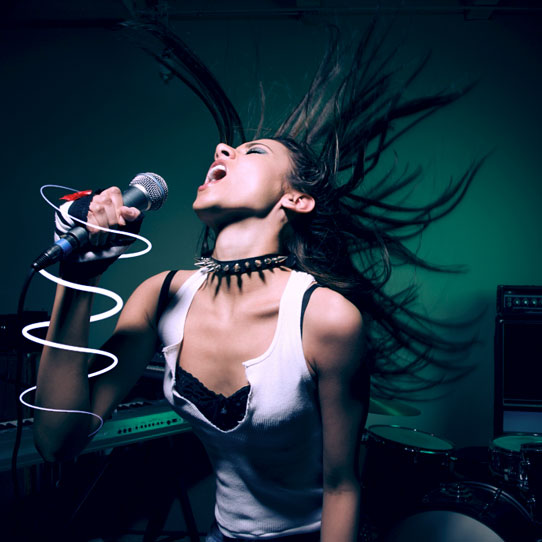
Firstly, create a new layer, then grab your Pen Tool (P) and draw out a spiraling path, as if you have a snake wrapped around the arm.
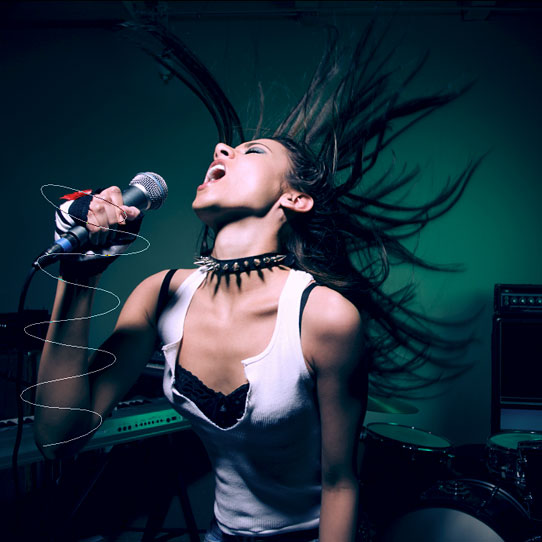
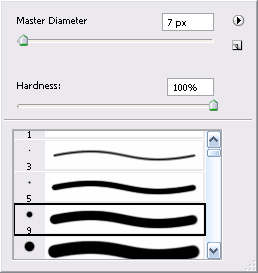
Then select the Brush Tool (B) and set your diameter to 7px, with the Opacity and Flow at 100%, and your foreground color set to white. With your path still on the artwork, go back to the Pen Tool, right click on the canvas, and choose "Stroke Path." A menu will appear with the Brush set as the Tool. Check "Simulate Pressure" and press OK. This will make the beginning and end of your stroke thinner.
Now you need to delete the parts you want hidden behind the arm. With your stroke layer selected, choose "Add layer mask" at the bottom of the Layers Palette. Use the Polygonal Lasso Tool (L) to select areas of the arm you want in front of the stroke -- use your eye and imagine how this path will wrap around the arm. Make sure your mask is active by clicking on it, and fill these selected areas with black. They should now be cut out, appearing as if they're behind the arm.
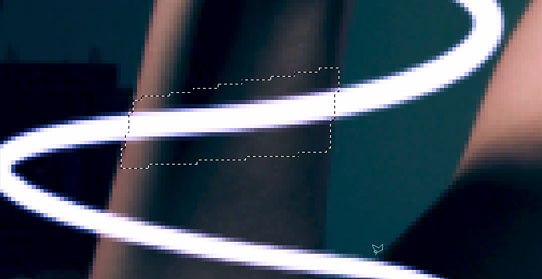
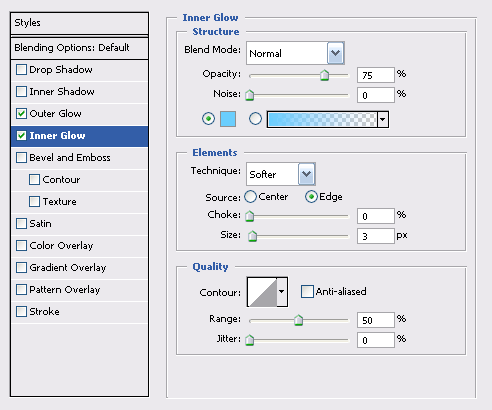
Right click on your stroke layer and choose Blending Options. A Layer Style menu will appear, where you'll be adding an Inner and Outer Glow to the stroke, making the edges of it glow with a blue hue. Use the settings below:
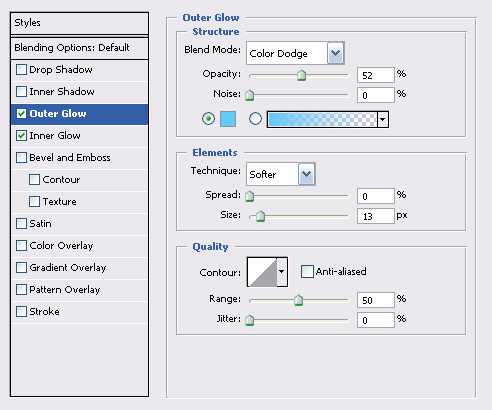
Make a copy of your stroke layer and right click on the Layer Effects icon. Choose "Clear Layer Style" -- we simply want to blur this layer (about 6 pixels) to add another layer of glow. Everything's looking nice and illuminated here, so let�s add some sparkles. With your Brush Tool, add some quick spots around your glowing path with varying small brush sizes (3 - 5px). Make as many as you want here, as you're always free Erase undesired sparkles.

We're now going to make a secondary stroke to create another level of motion. Use the Pen Tool to go over your original path, but make it a bit different and overlap parts. Select a smaller diameter brush this time with a 50% opacity, and stroke the path as before.
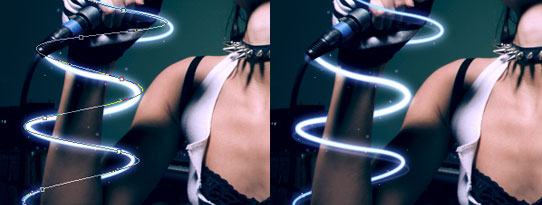
Our energy beam is nearly there. To make the effect more dramatic, you can adjust the overall hue of your photo. Create a new Curves adjustment layer, and tweak the colors to get a vibrant blue atmosphere. Download the Curves preset below to load it in your document. After your colors are locked in, use the Dodge Tool (O) (with a diameter of 35 pixels and the exposure set to 25%) to brush in some highlights underneath your beam, directly on the background photo. This makes it appear as if your beam is casting light on to the arm.
Download blue.acv
For the last part of this effect, we'll add one more layer of shimmer. Hold down Ctrl and click on your main stroked path in the layers palette -- your path should now be selected. Go to Select › Modify › and Expand the selection by 7px, then feather it by 10px.
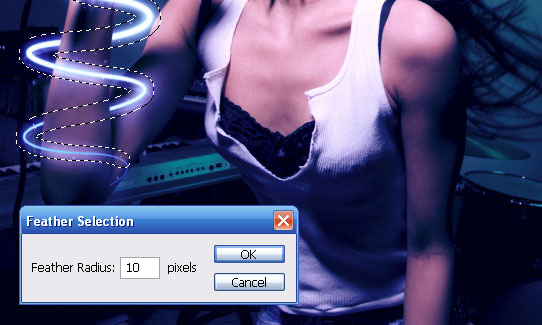
Now select your background photo layer and apply a Plastic Wrap filter, found in your Artistic filters. This will add some wispy lines around your path. Set the Highlight Strength to 20, the Detail to 6, and the Smoothness to 8. Finally, lightly Gaussian Blur your background layer with the feathered selection still active.

Glowing efek

Pada tutorial photoshop kali ini, kita akan belajar bagaimana caranya membuat efek glow di sekitar objek gambar. Efek glow adalah efek pendaran cahaya seperti yang biasa kita lihat pada lampu neon. Tutorial photoshop kali ini akan menjelaskan langkah demi langkah bagaimana menciptakan efek glow, memadukannya dengan gambar, dan pewarnaan harmonis agar gambar terlihat menyatu dengan efek-efek sekitarnya.


Hasil Akhir Tutorial

Tutorial Photoshop—Glowing Dance


Langkah-langkah tutorial :

STEP 1

Buat sebuah dokumen baru. Berikan warna gradasi radial dari warna biru ke biru tua untuk background.

Tutorial Photoshop—Glowing Dance

STEP 2

Masukkan gambar. Untuk gambar pada tutorial ini, bisa ditemukan disini. Beri nama layer untuk gambar dengan nama 'girl'. Selanjutnya, crop gambar tersebut. Untuk cara cropping gambar di photoshop, bisa dilihat disini : menghapus background di photoshop.

Tutorial Photoshop—Glowing DanceTutorial Photoshop—Glowing Dance

STEP 3

Tarik layer girl ke ikon add new layer dibagian bawah layer palette untuk menduplikasi layer girl. Sekarang kita sudah mendapatkan layer baru bernama layer 'girl copy'. Posisikan layer 'girl copy' di bawah layer 'girl'.

Tutorial Photoshop—Glowing Dance

STEP 4
Pilih layer girl copy, lalu pada menu bar pilih filter > blur > motion blur. Atur nilai pada motion blur panel seperti gambar dibawah ini. Jika sudah, klik ok untuk keluar dari motion blur panel.

Tutorial Photoshop—Glowing Dance

STEP 5

Ulangi memberikan efek motion blur sekali lagi. Caranya, pilih layer 'girl copy', lalu pilih filter > motion blur.

Tutorial Photoshop—Glowing Dance

STEP 6

Klik ganda pada layer 'girl copy' untuk membuka layer style. Pada layer style, conteng check list pada bagian Inner glow, dan atur nilainya seperti gambar dibawah ini. Jika sudah, klik ok.

Tutorial Photoshop—Glowing Dance

STEP 7

Duplikasi layer 'girl copy', dan kita akan mendapat layer baru dengan nama layer 'girl copy 2'.

Tutorial Photoshop—Glowing Dance

STEP 8

Pilih layer girl, lalu tekan dan tahan tombol Alt di keyboard. Klik pada icon Create new fill or adjustment layer lalu pilih Exposure. Pastikan anda tetap menekan tombol Alt sampai Exposure terpilih. Atur nilai pada Exposure panel seperti pada gambar dibawah.

Tutorial Photoshop—Glowing Dance

STEP 9

Sekarang, kita akan membuat garis-garis glow yang melingkar dibagian tubuh si cewek. Untuk itu, langkah pertama, buka Brushes palette dengan cara pilih Window > Brushes (F5). Atur nilai pada Brushes tip shape dan Shape dynamics seperti gambar dibawah ini.

Tutorial Photoshop—Glowing DanceTutorial Photoshop—Glowing Dance

STEP 10

Sekarang buat sebuah layer baru, beri nama layer dengan 'glow'. Pada layer baru tersebut, buat sebuah garis menggunakan pen tool (P) seperti pada gambar dibawah ini. Jika sudah, klik kanan lalu pilih Stroke Path. Pada pop up yang muncul, pilih brushes, conteng check list pada simulate brushes lalu klik Ok. Maka garis tadi akan berubah dengan brushes seperti gambar dibawah ini.

Tutorial Photoshop—Glowing DanceTutorial Photoshop—Glowing Dance

STEP 11

Sekarang pilih layer glow, lalu klik ikon add layer mask dibagian bawah layer palette.

Tutorial Photoshop—Glowing Dance

STEP 12

Klik pada thumbnail layer mask, pilih brushes tool (B), dan pastikan warna foreground photoshop adalah hitam (D). Mulai sapukan brushes pada bagian-bagian garis. Dalam kasus ini, kita ingin membuat seolah garis glow melingkar melalui objek tubuh si cewek. Atur besar kecil brushes dengan tombol [ dan ] di keyboard agar dapat menjangkau bagian-bagian detail dengan rapi.

Tutorial Photoshop—Glowing DanceTutorial Photoshop—Glowing DanceTutorial Photoshop—Glowing Dance

STEP 13

Klik ganda pada layer glow untuk membuka layer style. Conteng check list pada Outer glow, dan atur nilainya seperti pada gambar di bawah ini.

Tutorial Photoshop—Glowing Dance

STEP 14

Buat layer baru dan beri nama layer 'glow 2'. pada layer 'glow 2', ulangi proses memberikan garis glow untuk bagian yang berbeda pada gambar. Jika sudah, klik kanan pada layer 'glow' dan pilih copy layer style. Lalu klik kanan pada layer 'glow 2' kemudian pilih paste layer style.

Tutorial Photoshop—Glowing Dance

STEP 15

Lanjutkan membuat layer 'glow 3'. Langkah-langkahnya sama saja dengan STEP 14.

Tutorial Photoshop—Glowing Dance

STEP 16

Buat sebuah layer baru, beri nama layer 'circle glow'. Buat sebuah lingkaran menggunakan Elliptical Marquee Tool (M) dan isi dengan warna putih menggunakan Paint Bucket Tool (G). Tekan Ctrl + D di keyboard untuk menghilangkan seleksi.

Tutorial Photoshop—Glowing Dance

STEP 17

Klik ganda layer Circle Glow untuk membuka layer style. Atur nilai pada Inner shadow, outer glow, dan inner glow seperti gambar-gambar dibawah ini.

Tutorial Photoshop—Glowing DanceTutorial Photoshop—Glowing DanceTutorial Photoshop—Glowing Dance

STEP 18

Duplikasi layer circle glow menjadi beberapa layer. Gunakan Transform tool (Ctrl + T) untuk membuat ukuran circle glow bervariasi. Pilih semua layer Circle glow hasil duplikasi, kemudian tekan Ctrl + G di keyboard untuk mengelompokkannya dalam satu group.

Tips : Tekan dan tahan tombol Alt di keyboard, kemudian drag objek yang ingin di copy untuk membuat duplikasi.

Tutorial Photoshop—Glowing Dance

STEP 19

Buat layer baru, beri nama 'gradient'. Buat sebuah gradasi warna pelangi dengan gradient tool (G) kemudian drag pada area kerja seperti gambar dibawah ini.

Tutorial Photoshop—Glowing Dance

STEP 20

Ubah blending mode dari layer 'gradient' menjadi color dodge. Jika sudah, klik ikon create new fill or adjustment layer untuk menambahkan layer mask. Klik thumbnail layer mask, dan mulai sapukan brush menggunakan brushes tool (B) berwarna hitam seperti gambar dibawah.

Tutorial Photoshop—Glowing Dance

STEP 21

Buat layer baru, beri nama dengan 'warna'. Ambil seleksi dari layer 'girl' dengan cara Tekan dan tahan tombol ctrl di keyboard lalu klik pada thumbnail layer girl. Pilih gradasi warna pada gradient editor seperti pada gambar dibawah. Pastikan layer 'warna' aktif dan kemudian drag Gradient Tool pada area kerja. Tekan Ctrl + D untuk menghilangkan seleksi.

Tutorial Photoshop—Glowing DanceTutorial Photoshop—Glowing Dance

STEP 22

Ganti blending mode untuk layer warna menjadi Overlay.

Tutorial Photoshop—Glowing Dance

STEP 23

Pilih Layer group Glow, ganti juga blending mode-nya menjadi Overlay.

Tutorial Photoshop—Glowing Dance

STEP 24

Pilih layer glow 1, glow 2, dan glow 3 (tahan Shift di keyboard untuk memilih lebih dari satu layer), kemudian posisikan layer-layer tersebut di posisi paling atas pada layer palette. Caranya dengan menekan tombol Ctrl + Shift + ) di keyboard.

Tutorial Photoshop—Glowing Dance

Hasil Akhir

Kita telah menyelesaikan tutorial photoshop kali ini, dan beginilah hasil akhir yang dicapai dalam tutorial ini. Selamat mencoba, semoga bermanfaat. :)

Tutorial Photoshop—Glowing Dance

 
Penanggung Jawab Abdu-Zink| Supported by dytoshare